Vagrantを使う際に確認すること
Vagrantのインストールが正常に行われたことを確認するためにコマンドプロンプトで以下のようにコマンドを入力して確認します。
> vagrant --version ↵
Vagrant 2.2.5
バージョンが表示されましたので、正常にインストールが行われたことが確認できました。
Vagrantは、Boxと呼ばれる仮想マシン起動時のテンプレートとなるイメージファイルをダウンロードしてローカルにキャッシュします。同じBoxを利用する場合は、ローカルにキャッシュされたものを使用するので、2回目以降は高速に仮想マシンを構築できるのですが、ディスクイメージに相当する内容も含まれているため、多くのディスク容量を消費します。大容量のHDDであればあまり気にしなくても良いのでしょうがSSDにキャッシュされてしまうのは好ましくありません。
そこで、環境変数を設定してキャッシュ先を変更します。
-
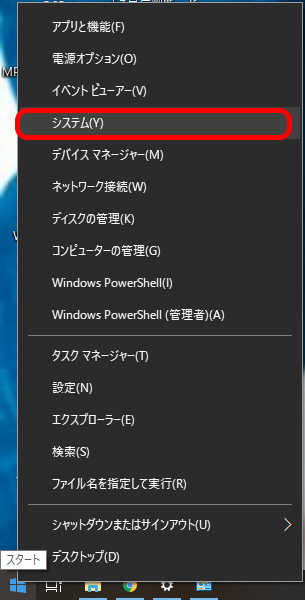
[スタート]メニューを右クリックしてメニューを表示します。
メニューから[システム]を選択します。
-
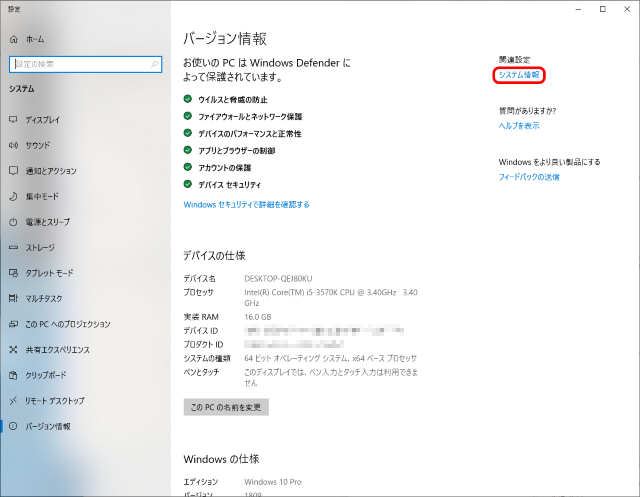
右側のメニューから[システム情報]を選択します。
-
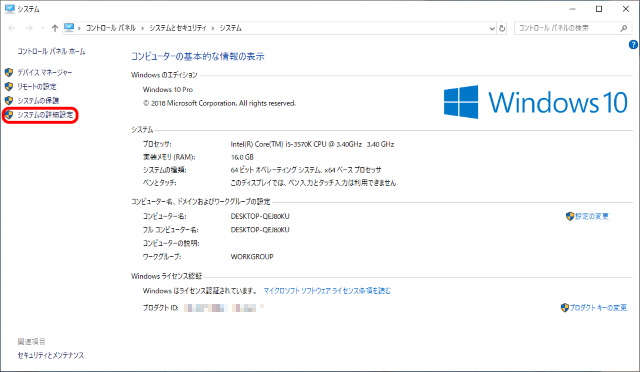
左側のメニューから[システムの詳細設定]を選択します。
-
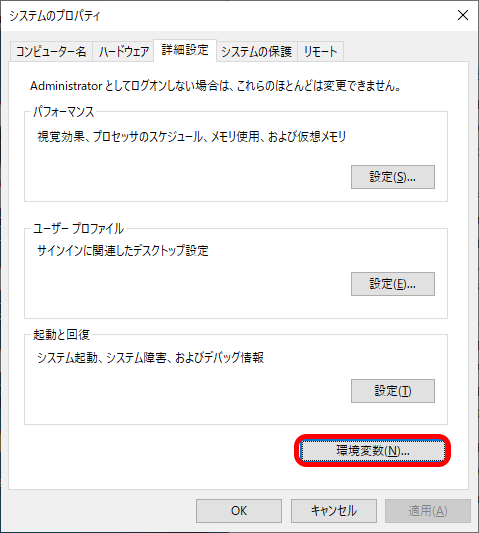
[詳細設定]タブの[環境変数]を選択します。
-
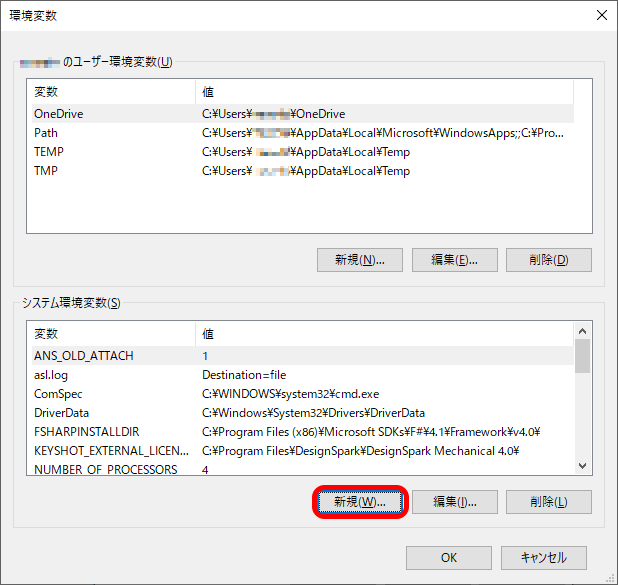
[システム環境変数]の[新規]を選択します。
-
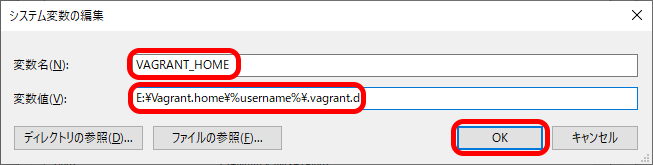
[変数名]に
VAGRANT_HOMEを指定します。
[変数値]にキャッシュを保管するフォルダを指定します。今回は、ユーザ毎に管理できるように%username%環境変数を使用して保管先を分けています。
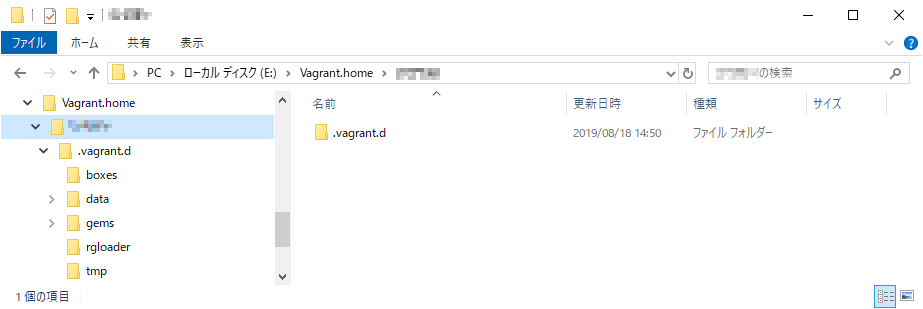
設定ができたことを確認します。
コマンドプロンプトを開きなおして、以下のようにコマンドを入力します。
> vagrant --help ↵
Usage: vagrant [options] <command> [<args>]

    -v, --version                    Print the version and exit.
    -h, --help                       Print this help.

Common commands:
     box             manages boxes: installation, removal, etc.
     cloud           manages everything related to Vagrant Cloud
     destroy         stops and deletes all traces of the vagrant machine
     global-status   outputs status Vagrant environments for this user
     halt            stops the vagrant machine
     help            shows the help for a subcommand
     init            initializes a new Vagrant environment by creating a Vagrantfile
     login
     package         packages a running vagrant environment into a box
     plugin          manages plugins: install, uninstall, update, etc.
     port            displays information about guest port mappings
     powershell      connects to machine via powershell remoting
     provision       provisions the vagrant machine
     push            deploys code in this environment to a configured destination
     rdp             connects to machine via RDP
     reload          restarts vagrant machine, loads new Vagrantfile configuration
     resume          resume a suspended vagrant machine
     snapshot        manages snapshots: saving, restoring, etc.
     ssh             connects to machine via SSH
     ssh-config      outputs OpenSSH valid configuration to connect to the machine
     status          outputs status of the vagrant machine
     suspend         suspends the machine
     up              starts and provisions the vagrant environment
     upload          upload to machine via communicator
     validate        validates the Vagrantfile
     version         prints current and latest Vagrant version
     winrm           executes commands on a machine via WinRM
     winrm-config    outputs WinRM configuration to connect to the machine

For help on any individual command run `vagrant COMMAND -h`

Additional subcommands are available, but are either more advanced
or not commonly used. To see all subcommands, run the command
`vagrant list-commands`.
ディレクトリが自動的に作成されたことで、正しく設定されたことが確認できます。
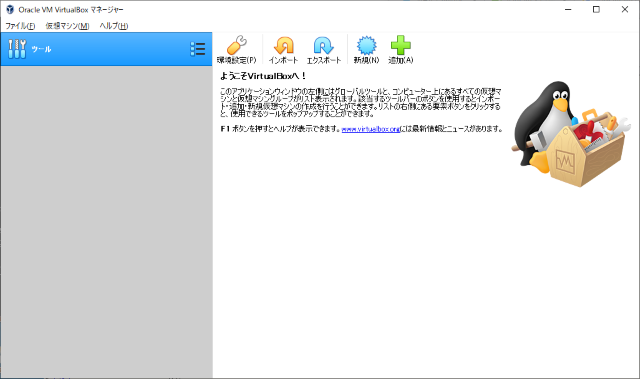
VirtualBoxを使う際に確認すること
VirtualBoxのインストールが正常に行われたことを確認します。
-
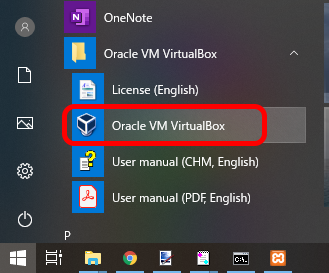
[スタート]メニューから[Oracle VM VirtualBox]を選択します。
-
Oracle VM VirtualBoxマネージャーが起動したことで、正常にインストールが行われたことが確認できました。
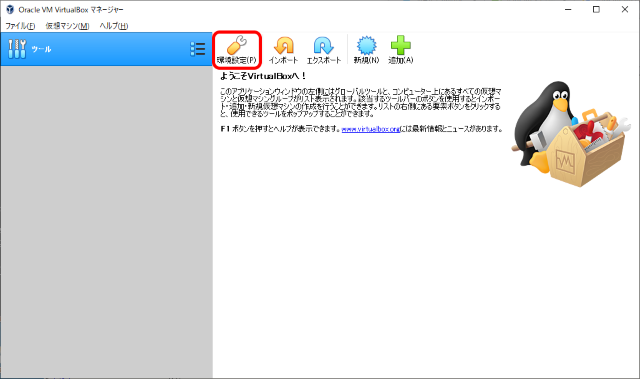
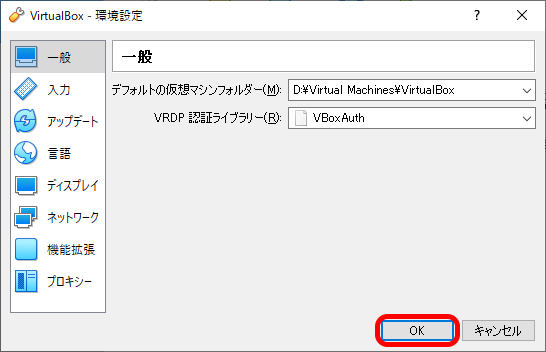
VirtualBoxでは、仮想マシン毎にディスクイメージなどを保管する必要があります。容量の大きなHDDに仮想マシンを構築するように設定を変更します。
-
[環境設定]を選択します。
-
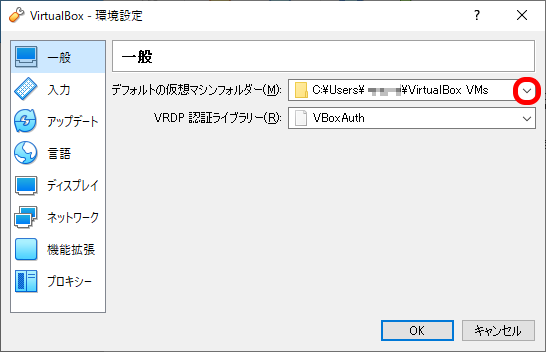
[一般]の[デフォルトの仮想マシンフォルダー]を変更します。
-
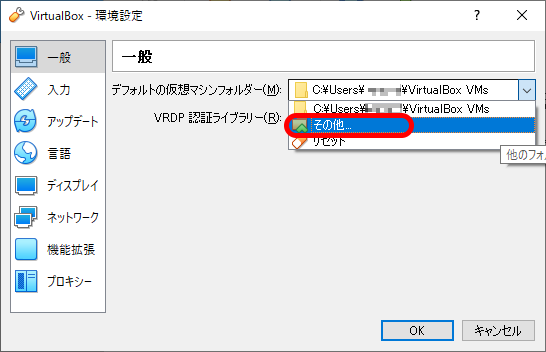
仮想マシンフォルダーを選択します。
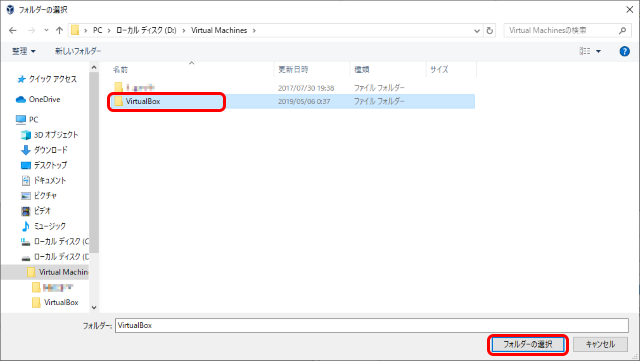
-
[OK]を選択します。
初めてのサーバ・プロビジョニング
早速仮想マシンを構築してみたいと思います。
まず、作業用のフォルダを作成して移動します。このフォルダにVagrantfileなどの設定情報が格納されます。
> e: ↵
> cd E:\MyDocuments\Project\Python ↵
> mkdir vagrant_test ↵
> cd vagrant_test ↵
最新のUbuntu Linuxのマシンを構築してみます。
> vagrant init ubuntu/disco64 ↵
A `Vagrantfile` has been placed in this directory. You are now
ready to `vagrant up` your first virtual environment! Please read
the comments in the Vagrantfile as well as documentation on
`vagrantup.com` for more information on using Vagrant.

> vagrant up ↵
Bringing machine 'default' up with 'virtualbox' provider...
==> default: Box 'ubuntu/disco64' could not be found. Attempting to find and install...
    default: Box Provider: virtualbox
    default: Box Version: >= 0
==> default: Loading metadata for box 'ubuntu/disco64'
    default: URL: https://vagrantcloud.com/ubuntu/disco64
==> default: Adding box 'ubuntu/disco64' (v20190816.0.0) for provider: virtualbox
    default: Downloading: https://vagrantcloud.com/ubuntu/boxes/disco64/versions/20190816.0.0/providers/virtualbox.box
    default: Download redirected to host: cloud-images.ubuntu.com
    default:
==> default: Successfully added box 'ubuntu/disco64' (v20190816.0.0) for 'virtualbox'!
==> default: Importing base box 'ubuntu/disco64'...
==> default: Matching MAC address for NAT networking...
==> default: Checking if box 'ubuntu/disco64' version '20190816.0.0' is up to date...
==> default: Setting the name of the VM: vagrant_test_default_1566122376865_14854
Vagrant is currently configured to create VirtualBox synced folders with
the `SharedFoldersEnableSymlinksCreate` option enabled. If the Vagrant
guest is not trusted, you may want to disable this option. For more
information on this option, please refer to the VirtualBox manual:

  https://www.virtualbox.org/manual/ch04.html#sharedfolders

This option can be disabled globally with an environment variable:

  VAGRANT_DISABLE_VBOXSYMLINKCREATE=1

or on a per folder basis within the Vagrantfile:

  config.vm.synced_folder '/host/path', '/guest/path', SharedFoldersEnableSymlinksCreate: false
==> default: Clearing any previously set network interfaces...
==> default: Preparing network interfaces based on configuration...
    default: Adapter 1: nat
==> default: Forwarding ports...
    default: 22 (guest) => 2222 (host) (adapter 1)
==> default: Running 'pre-boot' VM customizations...
==> default: Booting VM...
==> default: Waiting for machine to boot. This may take a few minutes...
    default: SSH address: 127.0.0.1:2222
    default: SSH username: vagrant
    default: SSH auth method: private key
Timed out while waiting for the machine to boot. This means that
Vagrant was unable to communicate with the guest machine within
the configured ("config.vm.boot_timeout" value) time period.

If you look above, you should be able to see the error(s) that
Vagrant had when attempting to connect to the machine. These errors
are usually good hints as to what may be wrong.

If you're using a custom box, make sure that networking is properly
working and you're able to connect to the machine. It is a common
problem that networking isn't setup properly in these boxes.
Verify that authentication configurations are also setup properly,
as well.

If the box appears to be booting properly, you may want to increase
the timeout ("config.vm.boot_timeout") value.
SSHで仮想マシンに接続してみます。
> vagrant ssh ↵
vagrant@127.0.0.1: Permission denied (publickey).
おや?つながりません。
よく見るとvagrant upで、Timed out while waiting for the machine to boot.
と、エラーが発生しています。
原因を追究する必要が出てきました。